
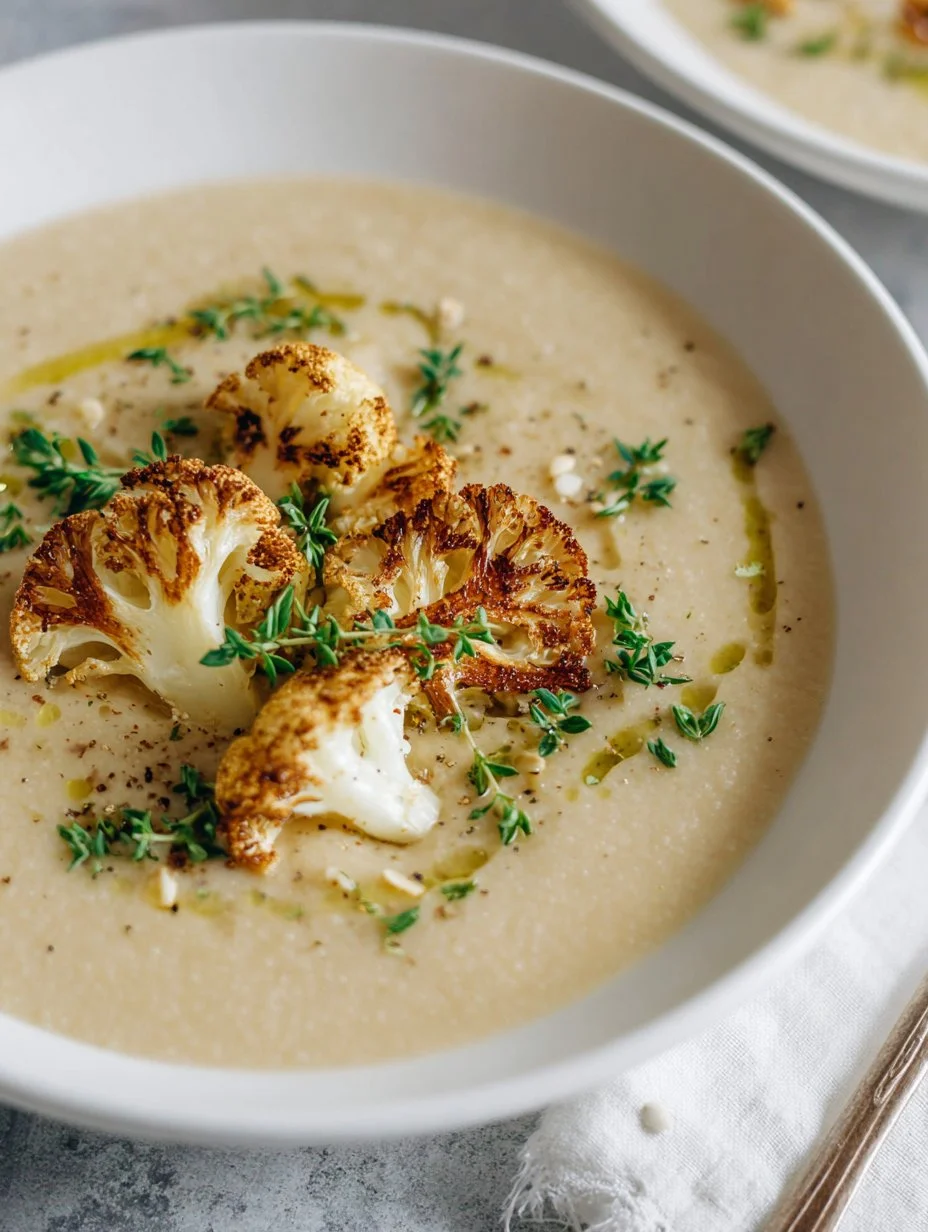
If you love cozy, comforting bowls, you’ll also love our Hearty Cheddar Garlic Herb Potato Soup.
Why You’ll Love This Roasted Cauliflower Soup
You will fall in love with this soup from the very first spoonful because it hits every note of true comfort food. Many creamy vegetable soups rely entirely on heavy flour roux, blocks of processed cheese, or cups of butter to get their body. This recipe takes a much lighter and more natural approach. The roasted cauliflower itself provides nearly all the rich, silky body once it is blended. This means you get all the creamy satisfaction of a thick chowder, but with the wholesome goodness of pure vegetables. It warms you up from the inside out, making it the perfect remedy for chilly autumn evenings, cold winter days, or anytime you want a comforting meal that will not weigh you down. Beyond its cozy charm, this soup fits effortlessly into a busy life. You can prep the ingredients in just a few minutes, spread them onto a baking sheet, and let the oven do the heavy lifting while you take care of other things around the house. It is naturally versatile, pleasing everyone at your table whether they eat plant-based or love classic dairy. Plus, it holds up beautifully when made ahead of time, which means you can pack it for easy work lunches or pull it out of the fridge for a quick dinner when nobody feels like cooking.Cozy Flavor with Everyday Ingredients
The magic of this recipe lies in how basic kitchen staples work together to build layers of deep flavor. You likely have most of these items sitting in your pantry or crisper drawer right now. We do not boil raw cauliflower in water, which can leave it tasting watery, bland, or sulfurous. Instead, we pair it with yellow onion and whole cloves of garlic, coating them in olive oil, dried thyme, and smoked paprika before roasting. As the vegetables roast side by side, their juices mingle and brown on the hot pan. The garlic becomes soft, buttery, and sweet, losing its sharp raw bite completely. The onions caramelize and add rich savory depth, while the smoked paprika lends a gentle bacon-like warmth that makes the soup taste as if it simmered all afternoon long. A splash of fresh lemon juice stirred in at the very end brightens everything up, cutting through the richness and making the subtle roasted flavors pop on your tongue.Quick to Make, Easy to Love
Dinner does not need to take hours of active stirring to be deeply satisfying. With this recipe, your active prep time is around ten to fifteen minutes. Chopping the cauliflower into florets does not need to look neat or perfect because everything gets pureed into a silky soup anyway. Slicing the onion takes less than two minutes, and the garlic cloves go right onto the baking sheet whole in their natural shape. Once your pan is in the oven, you have nearly half an hour of free time to relax, set the table, or help kids with homework. When the roasted vegetables come out tender and browned, they need just five quick minutes in the simmering pot with your broth before blending. Because we line the baking sheet with parchment paper, cleaning up afterward is virtually effortless. You end up with only one pot, a cutting board, and your blender to wash, leaving you with more time to sit down and enjoy your meal.Ingredients and Substitutions
To get the absolute best results from this soup, picking fresh, wholesome ingredients makes all the difference. Because this recipe uses a small list of basic components, each one carries an important job in building the overall aroma, color, body, and taste. Taking a moment to select firm, fresh produce will give you a bright, naturally sweet flavor that tastes clean and delicious.What You’ll Need for This Recipe
Fresh Cauliflower: You will need one large head of fresh cauliflower, weighing around 2 to 2.5 pounds. Look for a head that feels heavy for its size with compact, tight florets that are creamy white and free of dark brown spots or yellowing. The green outer leaves should look crisp and fresh rather than wilted. Cauliflower is the star and base of the whole dish. As it roasts, its starches break down into natural sugars, giving the soup its creamy body and nutty aroma without needing lots of heavy starches or thickeners.
Yellow Onion: One medium yellow onion brings essential savory sweetness to the mix. Yellow onions have a wonderful balance of sharp sulfur compounds that melt away into sweet, mellow notes when exposed to steady oven heat. Slicing the onion allows maximum surface contact with the hot baking sheet, promoting rich browning that builds a savory backbone for the broth.
Fresh Garlic Cloves: Four medium to large cloves of fresh garlic give the soup a gentle, aromatic warmth. Be sure to use fresh cloves rather than pre-minced jarred garlic, which often has a bitter or sour preservative taste. Leaving the cloves whole protects them from burning during roasting. In the oven, they turn soft, golden, and sweet like roasted garlic butter, adding a deep savory note that melts right into the soup during blending.
Extra Virgin Olive Oil: Three tablespoons of good quality olive oil are needed to coat the vegetables thoroughly. The oil conducts the oven’s heat into the vegetables, helping them brown evenly instead of simply steaming and drying out. It also carries the fat-soluble compounds in the herbs and spices, distributing the seasoning into every single bite and contributing a rich, pleasant mouthfeel.
Kosher Salt: One teaspoon of kosher salt brings out the natural flavors of the roasted vegetables. Salt does more than make food salty; it draws out water so the cauliflower browns better in the oven and balances the natural sweetness of the caramelized onion and garlic. You can always sprinkle in a little extra right before serving to match your personal taste.
Freshly Ground Black Pepper: A half teaspoon of freshly cracked black pepper adds a mild, woody bite that cuts through the soup’s velvety texture. Using freshly ground peppercorns rather than pre-ground pepper from a tin gives you a much brighter aroma and a warm, clean kick that lingers gently on the palate.
Dried Thyme: One teaspoon of dried thyme (or two teaspoons of fresh thyme leaves) gives the soup a classic, earthy herb note that pairs naturally with roasted root and brassica vegetables. Dried thyme holds up wonderfully to the high heat of the oven, releasing its aromatic oils directly into the olive oil as the florets bake.
Smoked Paprika: A half teaspoon of smoked paprika is our secret flavor booster. Made from smoke-dried chili peppers, it adds a gorgeous faint orange warmth to the soup’s final color and a subtle, wood-smoked depth that tricks your taste buds into thinking this soup was made with rich bacon drippings, all while keeping the dish completely meat-free.
Broth (Vegetable or Chicken): Four cups of low-sodium broth form the liquid foundation of the soup. If you want to keep the dish strictly vegetarian or vegan, choose a rich, golden vegetable stock made with carrots, celery, and leeks. If you eat meat, a mild low-sodium chicken broth works wonderfully, adding light savory body without overpowering the delicate cauliflower flavor. Using low-sodium broth is important because it gives you full control over the salt level.
Heavy Cream (or Unsweetened Coconut Milk): Three-quarters of a cup of dairy heavy cream adds an irresistibly luxurious, silky finish. It smooths out any tiny vegetable fibers left after blending, turning the texture into liquid velvet. If you avoid dairy, full-fat canned unsweetened coconut milk or raw cashew cream makes an equally creamy, rich substitute that blends seamlessly into the savory flavors.
Fresh Lemon Juice: One tablespoon of freshly squeezed lemon juice is the vital finishing touch. Do not skip this step! Heavy cream and roasted vegetables can taste quite rich, and a small splash of fresh acid cuts right through the fat, waking up the subtle herbs and making the entire bowl taste vibrant and fresh.
Fresh Parsley or Chives: Two tablespoons of finely minced fresh flat-leaf parsley or delicate chives add a burst of bright green color on top of the pale soup. Beyond visual beauty, fresh herbs offer a clean, grassy freshness that contrasts nicely with the deeply roasted flavors below.
Toasted Pumpkin Seeds (Pepitas): Two tablespoons of toasted pumpkin seeds provide an essential crunchy texture. Because the pureed soup is completely smooth and velvety, adding a handful of crispy, nutty roasted pepitas on top gives your teeth something delightful to chew, making the eating experience much more interesting and satisfying.
Smart Swaps for Dietary Needs
This recipe is naturally adaptable, making it simple to serve guests with diverse food preferences and dietary needs without having to cook multiple separate pots. To make the soup completely Dairy-Free and Vegan, simply replace the heavy cream with three-quarters of a cup of full-fat canned coconut milk. Make sure to stir the can well before measuring so the rich cream and water combine. Coconut milk adds a lovely silkiness without making the soup taste like dessert, especially alongside the savory garlic and smoked paprika. Another fantastic vegan alternative is homemade cashew cream, made by blending raw soaked cashews with warm water until smooth. Be sure to use vegetable broth rather than chicken broth to keep it entirely plant-based. For those eating Gluten-Free, this recipe is naturally safe right from the start. Unlike traditional cream soups that begin with a flour and butter roux, this soup relies entirely on the natural starches of the blended cauliflower for its thick body. Just check the label on your store-bought vegetable or chicken broth to ensure it is certified gluten-free, as some commercial brands include hidden yeast extracts or wheat byproducts. If you are following a Low-Carb or Keto lifestyle, this soup is an absolute dream meal. Cauliflower is famous for being a low-carb powerhouse. One generous bowl of this soup has very few net carbs, while the olive oil and heavy cream provide healthy, satisfying fats that keep you full for hours. You can even top your bowl with crispy crumbled bacon or extra shredded sharp cheddar cheese to bump up the fat and protein content even further. For cooks watching their Sodium Levels, simply make sure to choose a no-salt-added vegetable or chicken stock. You can reduce the kosher salt added to the sheet pan to a half teaspoon and rely on extra fresh lemon juice, fresh cracked black pepper, and roasted garlic to deliver bold, vibrant flavor without extra sodium.Smart Variation (Optional)
One of the best things about this recipe is how easily it accepts new twists depending on what you have in your refrigerator or how you want to serve it: The Tender Pasta Addition: If you want to turn this silky vegetable soup into a heartier, kid-friendly dinner, cook a cup of small pasta shapes—like ditalini, small shells, or orzo—in a separate pot of salted water. Ladle the hot, blended cauliflower soup into bowls and stir in a big scoop of the warm pasta. The silky soup coats every piece of pasta like a creamy Alfredo sauce, creating an irresistible bowl of comfort. The Slow Cooker Adaptation: While roasting in the oven delivers the best caramelization, you can adapt this for a slow cooker on busy mornings. Toss the cauliflower, chopped onion, and garlic with the oil, salt, pepper, thyme, and paprika, then place them in your slow cooker along with the broth. Cook on Low for 6 to 7 hours or High for 3 to 4 hours until the vegetables are fall-apart tender. Blend with an immersion blender, stir in the cream and lemon juice, and serve. * The Extra Vegetable Boost: You can easily add more garden vegetables to the roasting pan without changing the cooking time. Try tossing in one peeled and diced parsnip, a chopped carrot, or a cup of peeled butternut squash cubes alongside the cauliflower. These root vegetables will caramelize right alongside the florets, adding extra sweetness, fiber, and a warm golden hue to your final soup.How to Make Roasted Cauliflower Soup
Making this soup is a joyful, relaxed process that relies on simple cooking science. We use high-heat dry roasting first to build flavor through browning, followed by a gentle liquid simmer to marry the ingredients, and finish with blending to create an ultra-smooth consistency. Taking your time to let the vegetables develop deep golden edges on the baking sheet is the real key to success.Step-by-Step Cooking Instructions
Step 1: Preheat your oven to 425°F (220°C). Position your oven rack in the middle position to ensure the heat circulates evenly around the pan. Line a large, heavy rimmed baking sheet with a sheet of parchment paper or a silicone baking mat. This keeps the vegetables from sticking to the metal pan and makes cleaning up later as easy as throwing away the paper.
Step 2: Wash and thoroughly dry the cauliflower head with a clean kitchen towel. Cut the cauliflower into uniform bite-sized florets, keeping them roughly similar in size so they roast at the exact same speed. Slice the yellow onion into half-inch thick half-moons. Peel the four cloves of fresh garlic, leaving them completely whole so they roast slowly without burning or turning bitter in the hot oven.
Step 3: Scatter the cut cauliflower florets, sliced onions, and whole garlic cloves across your prepared baking sheet in a single, even layer. Drizzle evenly with three tablespoons of extra virgin olive oil. Sprinkle the kosher salt, freshly ground black pepper, dried thyme, and smoked paprika all over the vegetables. Use clean hands or a pair of tongs to toss everything together thoroughly, making sure every floret has a light, shiny coating of oil and spices.
Step 4: Slide the baking sheet into your preheated oven and roast for 25 to 30 minutes. At the 15-minute mark, use a wide spatula to toss and turn the vegetables so different sides touch the hot metal surface. Return the pan to the oven and continue roasting until the cauliflower edges are deeply golden brown, the tips are caramelized and slightly crisp, and the florets can be easily pierced through with the tip of a small knife.
Step 5: Remove the hot baking sheet from the oven. Carefully tip the parchment paper or use a large spoon to transfer all the roasted cauliflower, onions, and sweet roasted garlic into a large Dutch oven or heavy-bottomed soup pot set over medium heat. Pour in four cups of low-sodium vegetable or chicken broth. Bring the mixture to a gentle, bubbling simmer and let it cook uncovered for about 5 minutes, allowing the hot broth to soften the browned edges and absorb all the caramelized flavors from the vegetables.
Step 6: Turn off the stove burner. Lower an immersion hand blender all the way to the bottom of the soup pot. Turn the blender on low speed, then increase to high, moving the wand slowly around the pot in circular motions. Blend continuously for 2 to 3 minutes until all vegetable chunks are broken down and the soup becomes completely smooth, silky, and velvety. If you are using a standard countertop blender, let the soup cool for a few minutes first, transfer it carefully in two separate batches, remove the center cap of the blender lid and cover it with a folded kitchen towel to let steam escape safely, and blend until completely smooth before pouring it back into the pot.
Step 7: Place the pot back over low heat. Pour in three-quarters of a cup of heavy cream (or coconut milk) and one tablespoon of fresh lemon juice. Stir gently with a wooden spoon or ladle until the cream is completely incorporated and the soup is steaming hot throughout. Taste the soup carefully and add another pinch of salt or pepper if you feel it needs a little more lift. Ladle the creamy soup into warm bowls and finish each serving with a sprinkle of fresh chopped parsley or chives and a generous spoonful of crunchy toasted pumpkin seeds.
Tips for Texture, Timing & Tools
The equipment you choose makes a real difference in how smoothly your soup turns out. When it comes to your cooking pot, a heavy enameled cast iron Dutch oven or a thick three-ply stainless steel soup pot is the best choice. Heavy pots distribute heat evenly across their thick bottoms, preventing the thick, blended soup from scorching or sticking in the corners while you warm it up with the cream. Thin, lightweight aluminum pots tend to have hot spots that can quickly burn pureed vegetables if left unattended. Controlling your oven temperature is equally important. A true 425°F (220°C) is ideal because it creates high enough heat to caramelize the cauliflower before the florets turn to mush. If your oven runs cool, the vegetables will simply steam in their own released moisture and turn gray and soggy rather than golden and nutty. Give the florets plenty of room on the sheet pan; if they are piled on top of each other, use two baking sheets instead of one. Crowded vegetables trap steam, which stops proper browning. When it comes to blending, an immersion hand blender is the most convenient tool because you can puree everything directly inside your cooking pot without transferring boiling liquids across the counter. However, a high-speed countertop blender will always produce an even silkier, restaurant-level emulsion because its powerful blades spin much faster. If you use a countertop blender, safety must come first. Never fill a blender jar more than halfway with hot soup. Hot steam builds pressure quickly inside a closed container and can blow the lid off, causing painful burns and a huge kitchen mess. Always vent the small plastic center cap on the lid and hold a folded kitchen towel firmly over the opening while blending. Lastly, practice good knife safety when prepping your cauliflower. Cauliflower heads are round and can wobble dangerously on a cutting board. Start by slicing off the thick base stem so you create a flat, stable bottom. Place the flat side down against your cutting board before cutting the head in half through the center. From there, you can easily slice out the core and separate the florets with clean, confident knife cuts.Storage & Reheating
One of the greatest joys of making a big batch of roasted cauliflower soup is having ready-to-eat comfort food waiting for you in the refrigerator. Pureed vegetable soups actually tend to taste even better the next day because the sweet roasted garlic, fragrant thyme, and caramelized onion flavors have time to meld together into an even richer harmony. Knowing how to chill and store your soup properly guarantees that every bowl you enjoy later tastes just as delicious as the night it was made.How to Store It Right
Before packing your leftover soup away, let it cool down at room temperature for about 20 to 30 minutes. Putting a large pot of piping hot soup directly into your refrigerator can raise the internal temperature of your fridge, putting your milk, meats, and other perishable items at risk. However, do not leave it sitting out on the counter for longer than two hours. Once the soup is slightly cooled, ladle it into clean, airtight containers. Clear glass food storage containers or sturdy BPA-free plastic tubs with locking lids are ideal. Glass is especially good for vegetable soups because it does not absorb food odors, stain from the spices, or transfer any plastic taste into your leftovers. Be sure to leave about a half-inch of empty headspace at the top of the container so the liquid can expand slightly as it cools. Sealed tightly, this roasted cauliflower soup will stay fresh, fragrant, and delicious in your refrigerator for up to 4 to 5 days.Reheating Without Losing Flavor
Reheating this soup correctly ensures that the smooth, velvety emulsion stays intact and does not separate or turn watery. For the best texture, reheat your soup on the stovetop. Pour the desired portion into a small saucepan set over medium-low heat. As the soup warms, stir it frequently with a wooden spoon or silicone spatula. Blended soups naturally thicken as they sit in the fridge, so if your soup looks a bit too thick, simply splash in one or two tablespoons of broth, water, or a drizzle of cream to loosen it back to its original silky consistency. Bring it to a gentle, steaming simmer, but do not let it boil violently, as excessive heat can cause dairy cream to curdle. If you are short on time, the microwave works wonderfully for individual servings. Pour your soup into a microwave-safe ceramic or glass bowl. Cover the bowl loosely with a paper towel or a microwave splatter cover to catch any pops. Heat on high power in 45-second intervals, pausing to stir thoroughly between each burst. Stirring ensures the soup heats evenly from the center out to the edges and prevents hot spots from splashing onto the microwave walls. Once hot, let it rest for one minute, stir in a fresh drop of lemon juice if you want to revive its bright aroma, and enjoy.A Dish Worth Making Again and Again
Having a container of this soup waiting in your fridge turns a hectic weekday into a relaxed, nourishing moment. When you come home tired from work or need a quick lunch between tasks, you are just three minutes away from a wholesome, steaming bowl of real food. It makes weekend meal prep feel deeply rewarding because it reheats so effortlessly without losing any of its luxurious, silky texture or homemade charm.
Roasted Cauliflower Soup
Ingredients
Method
- Preheat the oven to 425°F (220°C) and line a large rimmed baking sheet with parchment paper for easy cleanup.
- Cut the cauliflower into uniform bite-sized florets, slice the yellow onion, and peel the whole garlic cloves.
- Spread the cauliflower, onion, and garlic evenly across the prepared baking sheet. Drizzle with olive oil and season with salt, black pepper, thyme, and smoked paprika. Toss thoroughly to coat.
- Roast in the preheated oven for 25 to 30 minutes, tossing halfway through, until the cauliflower edges are deeply golden brown, tender, and caramelized.
- Transfer the roasted vegetables and garlic into a large soup pot, pour in the broth, and bring to a gentle simmer over medium heat for 5 minutes to combine flavors.
- Carefully puree the soup using an immersion hand blender until completely smooth, silky, and velvety (or blend in batches in a standard heat-safe blender).
- Stir in the heavy cream and fresh lemon juice over low heat. Taste and adjust seasoning with additional salt or pepper, ladle into bowls, and garnish with fresh parsley and toasted pumpkin seeds.

2 thoughts on “Roasted Cauliflower Soup”